Bypassing SSL Pinning on Play Store AVDs without Frida
📲 🔓 Bypassing SSL Pinning on Play Store Android Device Emulators without Frida
Step by step, detailed guide for how to bypass the SSL Pining on Android Device Emulators (AVDs) with Play Store included and no depending on Frida.
Table of contents
- Installing Android Studio and Platform SDK Tools
- Downloading rootAVD via Git clone
- Creating an AVD with Play Store
- Getting root access on our AVD and setting up Magisk
- Installing our CA certificate with System authority
- Intercepting HTTP traffic from Google Play apps with our Burp/Caido
- Final words: For Hackers and Mobile Security Engineers
Requirements: What do we need?
- Android Studio
- Android SDK Platform-Tools
- Git (optional)
Step 1: Installing Android Studio and Platform SDK Tools
1. First we download both Android Studio and Git from official sources.
- Android Studio: https://developer.android.com/studio
- Git: https://git-scm.com/install/windows
If you are on Linux:
1
2
3
4
# For Debian
$: sudo apt install -y git
# For Fedora:
$: sudo dnf install git-all
If you are on macOS:
1
brew install git
2. Second, we install the Android SDK Platform-Tools with these steps:
- Launch Android Studio and go to Settings.
- Navigate to Languages & Frameworks > Android SDK > SDK Tools.
- Select “Android SDK Platform-Tools” and download it.
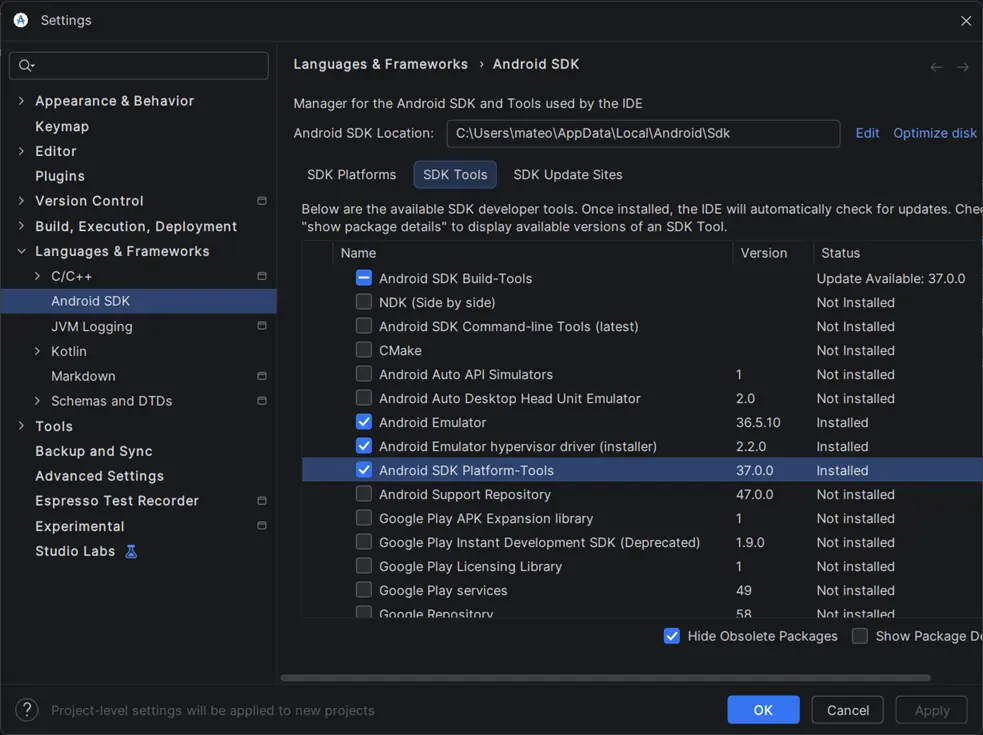
3. Finally, we ensure that our environment variables contains the PATH for the Android SDK Platform-Tools.
On Windows:
- Open Windows Search (Win + S), and search for “environment variables”

- Add the path to
C:\Users\<user>\AppData\Local\Android\Sdk\platform-tools
On Linux and macOS:
- Edit your
.zshrcfile:1
$: nano ~/.zshrc - Add the following lines:
1
2
3
export ANDROID_HOME="~/Library/Android/sdk" # For macOS
export ANDROID_HOME="/home/<user>/Android/Sdk" # For Linux
export PATH="$PATH:$ANDROID_HOME/tools:$ANDROID_HOME/tools/bin:$ANDROID_HOME/platform-tools"
Step 2: Downloading rootAVD via Git clone
So once we have installed our Android Studio with the SDK Platform-Tools, we proceed to clone the repo of rootAVD. This is an open-source project which contains an script for root an AVD (Android Virtual Device) from terminal.
- Clone the repo:
1
git clone https://gitlab.com/newbit/rootAVD.git
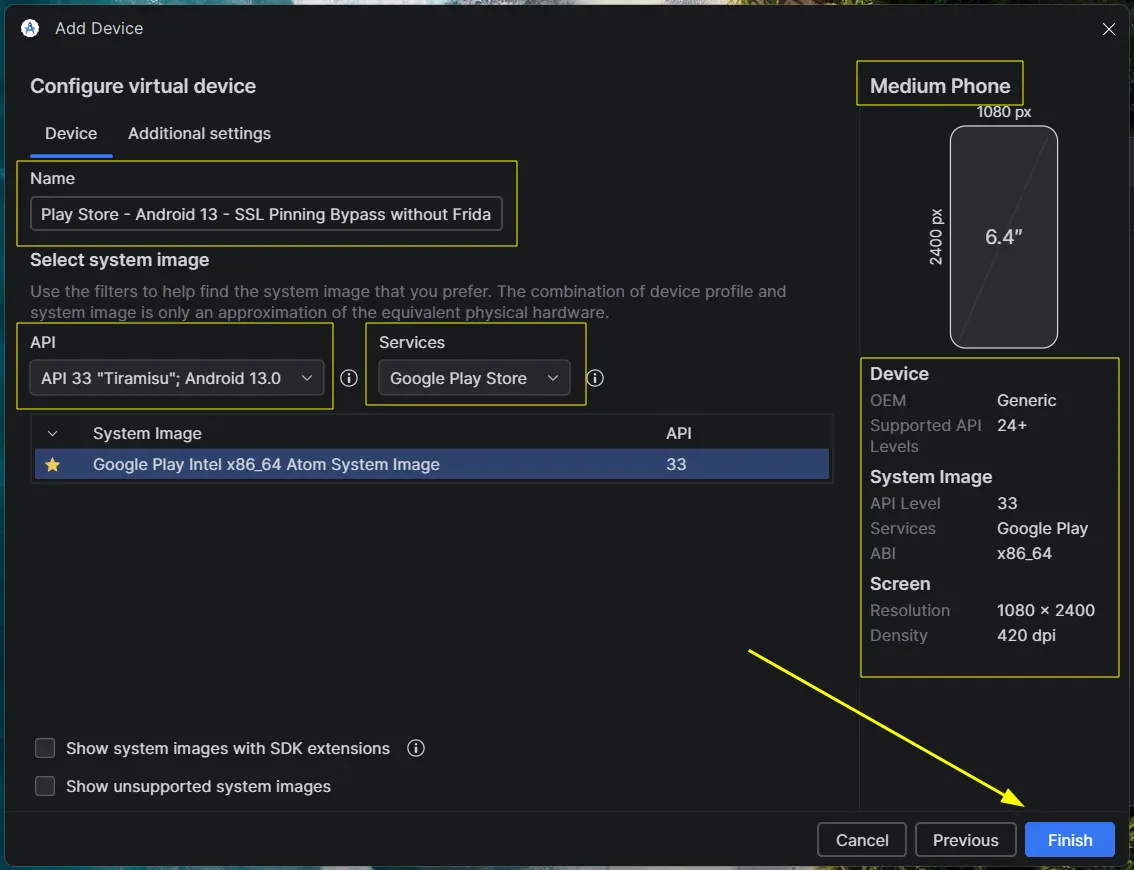
Step 3: Creating an AVD with Play Store
Here we go, now the easiest part is to choose a model for our AVD and the Android version.
- Open Android Studio.
- Go to Virtual Device Manager and select a “Medium Phone” with Google Play Store included.
- Boot the AVD.
Step 4: Getting root access on our AVD and setting up Magisk
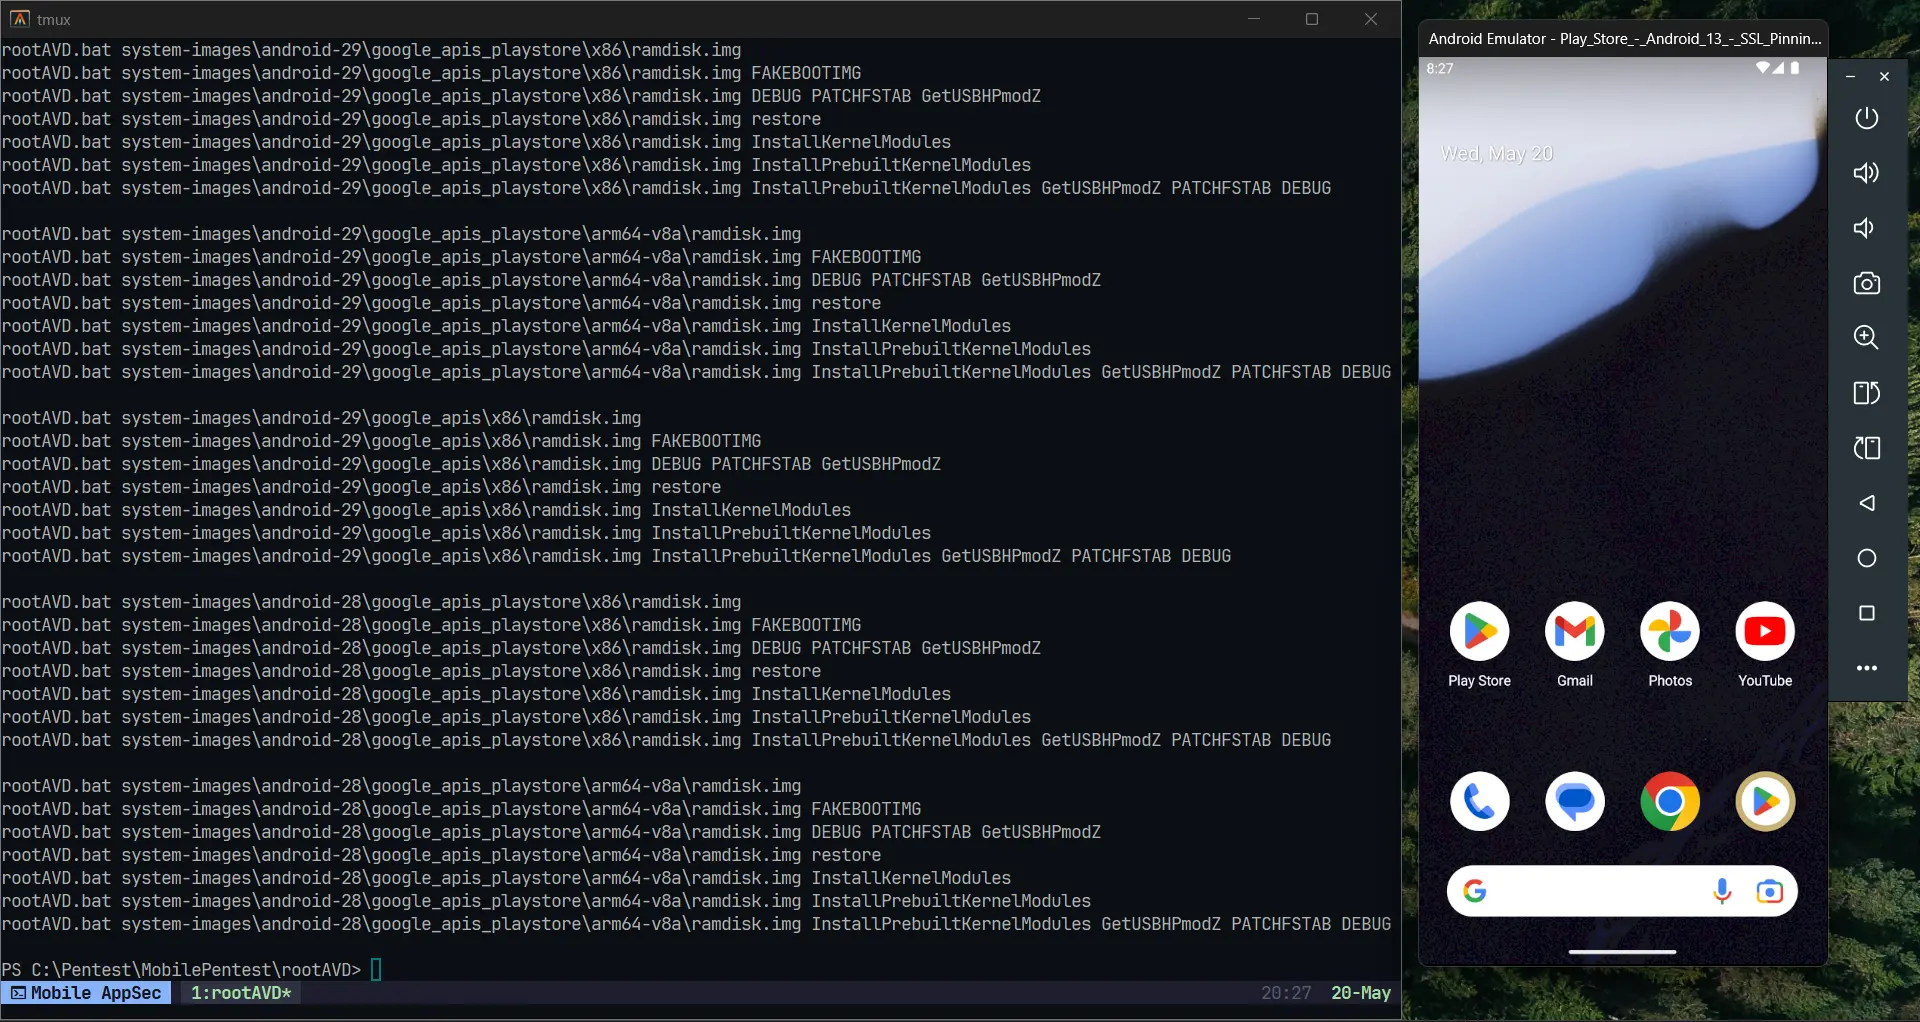
And here comes the crucial step, root our AVD with rootAVD script. To do so, we follow these steps:
1. Navigate to the rootAVD repo directory.
2. Run rootAVD with the argument ListAllAVDs to list the current installed AVDs:
1
2
3
4
5
6
7
8
9
10
PS C:\Pentest\MobilePentest\rootAVD> .\rootAVD.bat ListAllAVDs
...
rootAVD.bat system-images\android-33\google_apis_playstore\x86_64\ramdisk.img
rootAVD.bat system-images\android-33\google_apis_playstore\x86_64\ramdisk.img FAKEBOOTIMG
rootAVD.bat system-images\android-33\google_apis_playstore\x86_64\ramdisk.img DEBUG PATCHFSTAB GetUSBHPmodZ
rootAVD.bat system-images\android-33\google_apis_playstore\x86_64\ramdisk.img restore
rootAVD.bat system-images\android-33\google_apis_playstore\x86_64\ramdisk.img InstallKernelModules
rootAVD.bat system-images\android-33\google_apis_playstore\x86_64\ramdisk.img InstallPrebuiltKernelModules
rootAVD.bat system-images\android-33\google_apis_playstore\x86_64\ramdisk.img InstallPrebuiltKernelModules GetUSBHPmodZ PATCHFSTAB DEBUG
...
3. Now we select our correct path according to the API level of our AVD and run:
1
2
3
4
5
6
7
8
9
10
11
12
PS C:\Pentest\MobilePentest\rootAVD> .\rootAVD.bat system-images\android-33\google_apis_playstore\x86_64\ramdisk.img
[*] Set Directorys
[*] Testing for write permissions
[-] creating TEMPFILE File
##
## ... more logs ...
##
[-] Modded by NewBit XDA - Jan. 2021
[*] Huge Credits and big Thanks to topjohnwu, shakalaca and vvb2060
[-] Trying to shut down the AVD
[!] If the AVD doesnt shut down, try it manually!
PS C:\Pentest\MobilePentest\rootAVD>
4. And done! If the script was executed without error, then the AVD will shutdown automatically and it’s now rooted.
5. Next step: Magisk. We make a Cold Boot on our AVD and open the Magisk app which will be installed. Magisk will ask for a reboot to complete the setup, so we proceed.
6. Finally, we can test the root access:
1
2
adb shell
emu64x:/ $ su
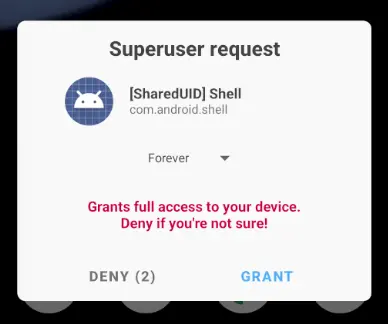
- At this point we grant root access to shell from our AVD where a prompt will show up.
1
2
3
emu64x:/ # whoami
root
emu64x:/ #
Step 5: Installing our CA certificate with System authority
So far we already have an AVD with root access and the Google Play Store included. Now we need to install our CA certificate.
1. Set up the CA certificate and push it to the device local storage:
- For Burp Suite:
1
2
3
4
5
# 1. Generate the Android subject hash from the DER file
$: openssl x509 -inform DER -subject_hash_old -in cacert.der | head -1
9a5ba575
# 2. Rename the file
$: mv cacert.der 9a5ba575.0
- For Caido:
1
2
3
4
5
6
7
8
9
# 1. Convert PEM (.crt) to DER (.der)
$: openssl x509 -in ca.crt -outform DER -out caido.der

# 2. Generate the Android subject hash from the DER file
$: openssl x509 -inform DER -subject_hash_old -in caido.der | head -1
ce01745e

# 3. Rename the file
$: mv caido.der ce01745e.0
- Then push it with:
1
2
3
4
$: adb push <cert_filename_burp_or_caido> /storage/self/primary/
# Example:
$: adb push ce01745e.0 /storage/self/primary
ce01745e.0: 1 file pushed, 0 skipped. 0.0 MB/s (660 bytes in 0.025s)
2. All the commands which makes the Android system accept our CA certificate as System Authority are all-in-one in this following script. We only need to replace the CA filename (e.g.: 9a5ba575.0 or ce01745e.0). See Line 15:
1
2
3
4
5
6
7
8
9
10
11
12
13
14
15
16
17
18
19
20
21
22
23
24
25
26
27
28
29
30
31
32
33
34
35
36
37
38
39
40
41
42
43
44
45
46
47
48
49
50
51
52
53
54
55
# Create a separate temp directory, to hold the current certificates
# Otherwise, when we add the mount we can't read the current certs anymore.
mkdir -p -m 700 /data/local/tmp/tmp-ca-copy

# Copy out the existing certificates
cp /apex/com.android.conscrypt/cacerts/* /data/local/tmp/tmp-ca-copy/

# Create the in-memory mount on top of the system certs folder
mount -t tmpfs tmpfs /system/etc/security/cacerts

# Copy the existing certs back into the tmpfs, so we keep trusting them
mv /data/local/tmp/tmp-ca-copy/* /system/etc/security/cacerts/

# Copy our new cert in, so we trust that too
cp /storage/self/primary/9a5ba575.0 /system/etc/security/cacerts/

# Update the perms & selinux context labels
chown root:root /system/etc/security/cacerts/*
chmod 644 /system/etc/security/cacerts/*
chcon u:object_r:system_file:s0 /system/etc/security/cacerts/*

# Deal with the APEX overrides, which need injecting into each namespace:

# First we get the Zygote process(es), which launch each app
ZYGOTE_PID=$(pidof zygote || true)
ZYGOTE64_PID=$(pidof zygote64 || true)
# N.b. some devices appear to have both!

# Apps inherit the Zygote's mounts at startup, so we inject here to ensure
# all newly started apps will see these certs straight away:
for Z_PID in "$ZYGOTE_PID" "$ZYGOTE64_PID"; do
    if [ -n "$Z_PID" ]; then
        nsenter --mount=/proc/$Z_PID/ns/mnt -- \
            /bin/mount --bind /system/etc/security/cacerts /apex/com.android.conscrypt/cacerts
    fi
done

# Then we inject the mount into all already running apps, so they
# too see these CA certs immediately:

# Get the PID of every process whose parent is one of the Zygotes:
APP_PIDS=$(
    echo "$ZYGOTE_PID $ZYGOTE64_PID" | \
    xargs -n1 ps -o 'PID' -P | \
    grep -v PID
)

# Inject into the mount namespace of each of those apps:
for PID in $APP_PIDS; do
    nsenter --mount=/proc/$PID/ns/mnt -- \
        /bin/mount --bind /system/etc/security/cacerts /apex/com.android.conscrypt/cacerts &
done
wait # Launched in parallel - wait for completion here

echo "System certificate injected"
3. We push this script to the /storage/self/primary/script.sh and execute it as root user:
1
2
emu64x:/ # sh storage/self/primary/script.sh
System certificate injected
4. Done, we successfully installed our CA certificate as a System Authority in our AVD with Play Store.
Step 6: Intercepting HTTP traffic from Google Play apps with our Burp/Caido
For testing purposes, I’ll be using the Reddit app to intercept its HTTPS traffic.
1. Each time our AVD is rebooted, we need to execute the script to add our CA certificate as System Authority, therefore ensure to first run the script before proceed.
2. We set up our proxy with the proxyadb() script:
1
2
3
4
5
6
7
8
9
10
11
12
13
14
15
16
17
18
19
20
21
22
23
24
25
26
27
proxyadb() {
  if [[ "$1" == "--connect" ]]; then
    if [[ -n "$2" && -n "$3" ]]; then
      adb shell settings put global http_proxy "$2:$3"
      echo "Proxy set to $2:$3"
    else
      echo "Please provide an IP address and a port."
    fi
  elif [[ "$1" == "--disconnect" ]]; then
    adb shell settings put global http_proxy :0
    echo "Proxy disconnected"
  elif [[ "$1" == "--status" ]]; then
    adb shell settings get global http_proxy
  else
    echo "Usage: proxyadb --connect <ip> <port> | --disconnect | --status"
  fi
}
_proxyadb_completions() {
  local -a completions
  completions=(
    '--connect'
    '--disconnect'
    '--status'
  )
  _describe 'proxyadb options' completions
}
compdef _proxyadb_completions proxyadb
- Set AVD proxy for
192.168.1.14:8082:
1
$: proxyadb --connect 192.168.1.14 8082
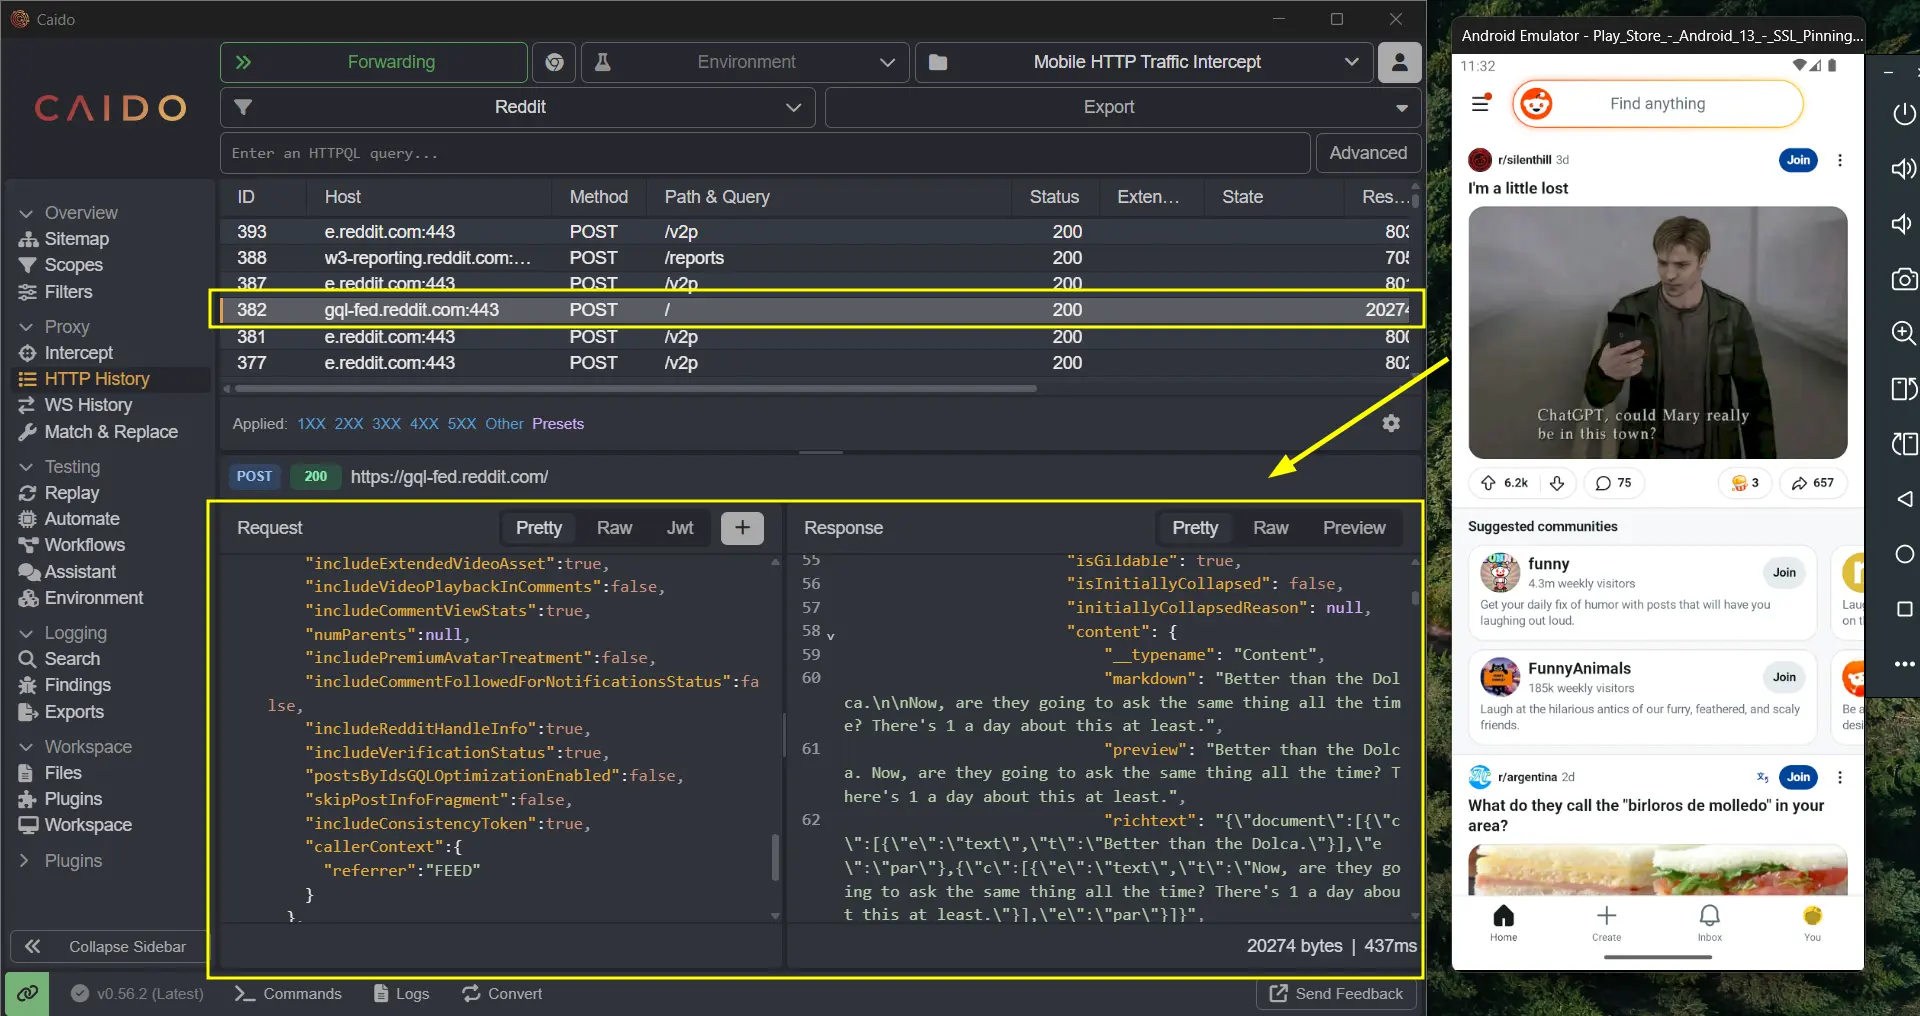
Yeah! Pwned! …
Final words: For Hackers and Mobile Security Engineers
“No technology is secure because of be new”
As we’ve seen, intercepting traffic from a mobile app is now almost as easy as intercepting traffic from a web app. The mobile threat landscape is big and growing rapidly, plus the rise of AI tools like Claude Code are only accelerates this trend. So, SSL pinning, which used to be a reliable barrier, can no longer be considered a serious obstacle on its own.
If you’re on the offensive side, the bottom line is that the barrier to entry keeps getting lower: often, all it takes is an emulator and a proxy. If you’re on the defensive side, treat pinning as “just one layer among many others”. Combine it with integrity checks, obfuscation, server-side validation, and anomaly detection, and assume that any control running on a device you don’t own can, eventually, be bypassed.
Thanks for reading, and Happy Hacking!